

Disclaimer | Download | Before you get started | Creating a level | Importing custom objects | Level configuration | Required Files
01. Disclaimer
Welcome to a brief manual on how to build simple levels for “Tiny & Big”. We’re releasing this tutorial because it was heavily requested by the community and people who love to cut stuff to pieces.
Be aware, though, that T&B was never designed to be modded easily, nor will we at Black Pants have the manpower / resources to guarantee any further support for those of you willing to try. We hope you’ll have fun, but you’ll be on your own.
Please feel free to use our forum to exchange experience and help each other: http://steamcommunity.com/app/205910/discussions/1/
02. Download
Without further ado, the MODKIT files (2.3 MB).
03. Before you get started
To create levels for T&B you’ll need Autodesk Maya (http://usa.autodesk.com/maya/trial/). Maya is a powerful but not very accessible 3D tool. Please understand that we can not support you in learning it. Fortunately, Autodesk is providing very useful video tutorials at their Youtube channel > (http://www.youtube.com/user/MayaHowTos). Once you have Maya downloaded, get our tinyandbig_modkit_v1.zip and unpack it. The ZIP includes the following files:
- mods/mylevel/mylevel.ma Basic maya scene which you can use to get started.
- mods/mylevel/mylevel.lua The example level configuration script that can be edited with a text editor of your choice. This allows you to set up the resources for the level, change physics settings like gravity, etc.
- mods/mods.lua The mod configuration script. This allows you to change basic game settings, add levels etc.
- mods/mytextures The folder where you should place your custom textures as psd, jpg, png, dds, bmp or tga.
- tinyandbig_modded.bat Double click to start your self-created levels. If you are a steam user go to your steam libary, right-click on ‘Tiny and Big: Grandpa’s Leftovers’, Properties / General / Set Launch Options… and enter ‘–game=mods’. Now start T&B as usual.
Copy the mod folder to your Tiny and Big levels folder, i.e. x:\…\Steam\steamapps\common\TinyAndBig\assets\levels or x:\…\TinyAndBig\assets\levels and the .bat to x:\…\TinyAndBig or x:\…\Steam\steamapps\common\TinyAndBig
04. Creating a level
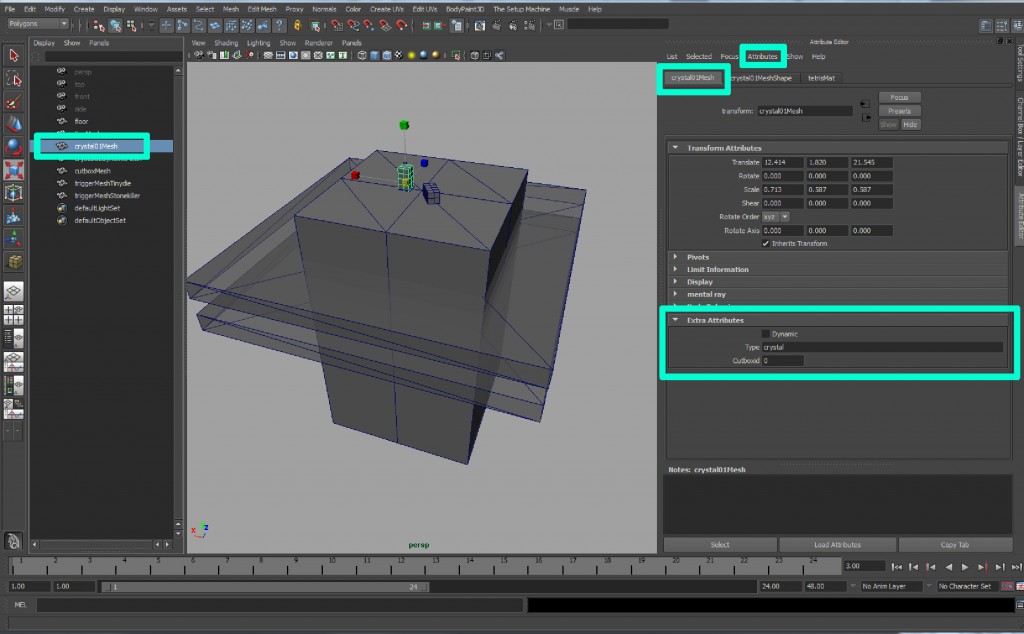
Open the file mylevel.ma with Autodesk Maya. This scene contains all basic elements that you need to create a simple level in which you may slice a custom object. Open the ‘Outliner’ to get an overview on the objects in the scene. Then press ctrl+a to open the ‘Attribute Editor’. Select an object and open the ‘Extra Attributes’ tab. Those Extra Attributes are custom parameters you can add to objects to define their function in the level. Have a look at all the objects in the scene.
floorMesh
By default every polygon mesh you create in maya will appear in the level. The object will be a passive collider, so Tiny and other dynamic objects will collide with and can i.g. walk on it but it can’t be moved around or sliced. The ‘floormesh’ has no additional entries under ‘Extra Attributes’. Now select ‘tinyMesh’.
tinyMesh
is a mesh that defines where in the scene the player will spawn when the level is launched. The mesh itself will not appear in the game. One ‘Extra Attribute’ called ‘type’ was added. It’s the most important attribute you’ll deal with. Nearly every object in the level has a type-attribute that defines it primary function in the game.
crystal01Mesh
is of type ‘crystal’. Crystals are objects that can be sliced with the laser. The second attribute ‘dynamic’ is a boolean which indicates if the object is dynamic from the beginning. In this case the box is unchecked, so the object will be static until sliced for the first time. The attribute ‘cutboxid’ is optional and will be explained later.
crystal02dynamicMesh
is a duplicate of crystal01 but with the ‘dynamic’ checkbox activated so it will be dynamic from the start. You can immediately push, pull and slice it.
cutboxMesh
is of type ‘cutbox’. If it overlaps with a non-dynamic crystal, the overlapping part will stay static after the object has been sliced. In our example, the lower part of the object will always stay connected to the floor while the upper part will become dynamic. If a crystal overlaps with more than one cutbox you may use the attribute ‘cutboxid’ to define with cutbox is connected with which crystal by giving cutbox and crystal the same cutboxid-parameter. You won’t need this feature in your first simple levels but it can get useful if many crystals stand close together.
triggerMeshTinydie
is an object that triggers a custom script when Tiny collides with the mesh. It’s of type ‘trigger’ while the ‘script’ attribute indicates the specific .lua-script which will be executed on contact. ‘triggertinydie.lua’ kills Tiny by contact. E.g. triggerMeshStonekiller will execute the script ‘triggerstonekiller.lua’ which deletes dynamic crystals on collision. You can find all available scripts in …assets/scripts/trigger. For more information how they work have a look at the comments.
Note that it’s irrelevant how you name the objects in the outliner. The game function of the objects is solely set by its Extra Attributes.
05. Importing custom objects
Now you could try to create a more complex scene by simply duplicating the existing level components with ctrl+d. But, of course, it’s more fun to destroy a mesh of your choice. So let’s import a custom object, make it sliceable and start the level. You may import nearly any 3D object. Go to File/Import and choose a 3D object of your choice. A new mesh will appear in your scene. Remember, to turn it into a sliceable object you have to add the Extra Attribute ‘type’ and give it the value ‘crystal’. Select the new mesh in your outliner, then open the attribute editor and choose ‘Attributes/Add Attributes…’.
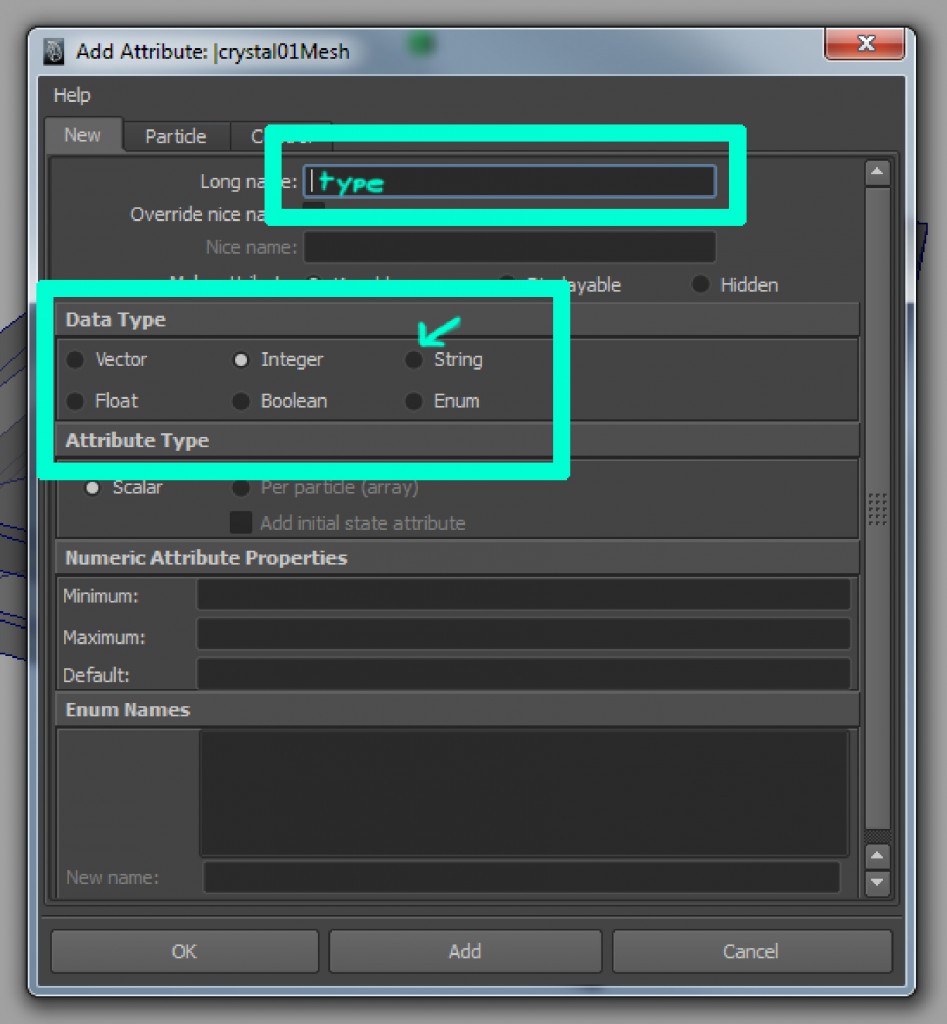
A dialogue will open. For ‘Long name’ choose ‘type’. Under ‘Data Type’ select ‘string’ which means that the attribute will have a text box in which you may enter any chain of strings, like ‘crystal’, ‘tiny’ or ‘yoyoclown’. For the attribute ‘dynamic’ you’d e.g. choose Data Type ‘Boolean’ which creates a false/true checkbox, for ‘cutboxid’ Data Type would be ‘Integer’ which allows you to enter whole numbers only. The new attribute called ‘type’ will appear under the Extra Attributes tab in the Attribute Editor. Type in “crystal”. Congratulations, your imported mesh is now sliceable!
If you start the scene and slice the object you’ll recognize that both new meshes will become dynamic (and even might get a heavy impulse in case the mesh was overlapping with another object other than a trigger or a cutbox). To connect the lower part of the mesh to the floor duplicate the existing ‘cutbox’ and place it at the bottom of the object. Use scale to cover the whole mesh if necessary. It will now stay static when sliced. You might not realize yet, but that’s already almost everything you need to know to create unique stages full of destruction and chaos. Enjoy!
06. Level configuration
At the very end some final tips. If you insist to give your levels names differing from mylevel.ma you may define the .ma loaded in line 5 of the mylevel.lua. If you get bored easily and like to mess around with the basic game settings you may open the mylevel.lua with any texteditor and change the parameters in line 7 – 38. In general every setting found in the main game settings.lua (…\TinyAndBig\assets\scripts\settings.lua) can be pasted to the mylevel.lua and thereby overwrites the basic settings. Of course you should be careful messing around with those parameters and always keep a backup of the original file.
Ultimately, while in game you may press the keys F1 – F12 to activate some development debug functions like physic-anaytics and ‘y’ to fly around in the level.
Have fun and happy slicing,
The Black Pants Team
07. Required Files
The required files mentioned in this manual are here as well – same as above.